Every wedding I have ever been to has done the garter and bouquet toss. For mine, I thought about cutting the event out for a couple of reasons. First, I want to keep my bouquet. Second, I want to keep things simple and the less events, the more simple. Lol! Third, I'd have to make myself a garter.
I wavered between doing it and not doing over the past few months. My fiance doesn't seem to care either way though if we do it, he seems certain that he's supposed to take my garter off with his teeth and I'm pretty certain that he's not. Lol! Anyways, if we do it, it means I'll need to create a toss bouquet and garter. That's two extra tasks to do. As simple as I want to make things on myself, the things that are keeping me from cutting the event is my love of crafty projects and my love of accessories. What can I say? I am a child of our consumerist culture and I just love things! Especially pretty, girly things!
So in considering making the toss bouquet, I had come to a few conclusions. First, the toss bouquet won't be a duplicate of my own bouquet because I didn't order flowers for it and didn't want to spend more money on flowers for it. That means the toss bouquet will be a completely different bouquet. If I don't end up using all the flowers I ordered, I'll make the toss bouquet out of the leftover flowers. So helping to decide whether or not I want to do the event will be if I have any or enough flowers leftover to make a toss bouquet.
As for the garter, that's easy. I have enough scrap fabric to make a garter. I can also use the extra lace cut from my wedding gown. Or I can buy some lace edging from a fabric store for pretty cheap. Lots of options. I'm not worried here. Lol!
So I'm hoping to drop by my parent's place this weekend to pick up the rest of the flowers I had shipped there. Once I have all my materials, I'll be making the bouquets, corsages and bouts. Then it's all about the centerpieces. Oh wait, I haven't finished the invitations!
Shoot! That has to take priority cause they gotta go out in a few weeks! Lol!
Thursday, May 27, 2010
Thursday, May 13, 2010
Casserole
I never made a casserole until I left my parents' place. Even then, I made it rarely. Lately, I've discovered that it is a great way to get rid of leftovers and other bits of food left in the fridge! It's also great cause it's an all-in-one meal.
My latest attempted included one small box of frozen spinach, some seitan cubes I had in the fridge, cooked rice, leftover onion and leftover veggie broth and some smoked gouda cheese that needed to be used up. I sliced and diced the seitan cubes and onion. For the veggie broth, I made a roux of butter and flour and added it to the broth to thicken into a creamy sauce/gravy. After I grated the cheese, I tossed everything together with some seasonings and an egg and baked it in the oven for about 45 to 50 minutes at 350 degress F. Then I sprinkled a little more cheese and bread crumbs on top and baked it for another 10 to 15 minutes. Gouda doesn't make for the best topping, but it was what was on hand. It actually turned out pretty yummy!
As a reference, I used this site to help me make my casserole:
http://lancaster.unl.edu/food/ciqi.shtml
Salads
I have never been a big fan of salads. If I can have something else, I'll usually not opt for a salad. That said, there are some really delicious salads out there! Whole Foods has this awesome mesclun salad that comes with medallions of goat cheese, cranberries and walnuts with a balsamic vinaigrette. I don't usually use the dressing as the cheese and cranberries and walnuts pack a mighty big flavor already, but I'll dip some leaves in it every so often. If you can get your hands on it, or if you can make your own, it's well worth it!
Another salad I love is the iceberg wedge from Mermaid Inn. I absolutely love their lobster sandwich, which I no longer indulge in. Now the only thing I can have there is their delicious iceberg wedge. It's a quarter of a small head of iceberg lettuce with a deliciously flavorful, thin blue cheese dressing drizzled on top. It's not really a meal, but I always come out feeling rather satisfied when I'm done.
On my own lately, I've been packing my own favorite version of salad. It's not low fat, but it satisfies me when I want to feel like I'm being good by eating a salad. It's got baby spinach, avocado, pepperjack cheese, tomatoes and carrots. There's no dressing as it depends mostly on the avocado and pepperjack for flavor. I rather prefer it without the dressing. So here's the recipe below:
1 cup baby spinach
1 medium carrot, cut into little match sticks or sliced into thin rounds
1 quarter of a tomato, sliced very thin
1 cubic inch of pepperjack cheese, sliced thin
1/2 of a small avocado
Toss the spinach, carrot and tomato together and top with cheese. I then spoon the avocado out of the shell and place the spoonfuls around the top of the salad. That's pretty much it. If you're even lazier, just put everything in a big bowl, cover and shake it around. That's it!
Thursday, April 29, 2010
Let's talk about flowers
I decided long ago that I wanted fake flowers. I didn't want to spend a thousand or two at a florist on flowers that were going to die. I also didn't have the resources to order fresh flowers online, store them in my fridge and then tie them into bouquets right before the wedding. Using fake flowers, I get to keep my wedding bouquet indefinitely, I get to make them way ahead of time and not worry about them and I can get flowers from any season.
I played around with the idea of making ribbon flowers, or just sewing fabric into ruffles and using that as a bouquet. Crepe paper flowers were also attractive and there are books you can download online that can teach you how to make different crepe paper flowers. Both ribbon and paper flowers can be quite pretty. They both also require a lot more work than I'm willing to put out these days.
Lately, I've been feeling exhausted. There are too many demands on my time and energy right now and there are always tasks in the back of my mind nagging me that I need to check off. It's hard to concentrate on any one thing when there are so many directions you're being pulled at once.
So anyways, back to the flowers. I definitely wanted daisies. Chaucer said that the daisy was the flower of true love because the yellow center represented happiness and warmth like the warmth of the sun, and the white petals represented purity, truth and innocence, free from guile. The popular red rose, he said, was false love and represented lust, and not true love. That is why I've always had a thing for daisies.
I also love lotuses. Not only are they pretty, but in buddhist culture, the lotus is revered for growing in the dirtiest of waters and still blooms clean. Unfortunately, they are not as popular a flower and thus, they are harder to find as silk flowers. Roses are everywhere and you can usually find hydrangeas as well. I specifically wanted lavender lotuses, but most of the ones I found weren't the right shade.
So I ordered cream gerbera daisies for my bridesmaids and little white daisies for the bouts. I'm also ordering lavender roses as filler flowers for the daisy bouquets and the bouts. I'm not sure I'll be using any filler flowers in my own bouquet. I supposed we'll see once the flowers all come in. The truth is, fake flowers are not necessarily cheaper than real ones, but I'm paying for the convenience of putting them together way ahead of time.
All in all, I have to make one bridal bouquet, a smaller toss bouquet, 4 bridesmaids bouquets, the groom's bout, 2 groomsmen bouts, 2 mommy corsages and 2 daddy bouts. So that's a total of 6 bouquets, 5 bouts and 2 corsages. If I have any time and resources left over, I'll make 3 extra corsages for the groom's sisters.
Wow, that's a lot of work! Lol!
Monday, April 26, 2010
Save the Date emails
So I finally got my rear in gear and sent out my Save-The-Date emails. It was a pain the butt getting the guest list together mainly because my better half wasn't very good about getting his list together right. The good news is that that is all in the past now! It's done!
The Save-The-Date emails were great because they forced us to get that guest list together. In turn, getting that guest list together and having to actually send something out based on it, brought a lot of questions to mind.
The first question was, do we send everyone we have an email address for a STD email? The answer was ultimately no. Some guests, like my grandmother, do not have email addresses. Some guests already know the date and are bad with emails. Some guests, we're still not sure we want to invite, and for some guests, we're only inviting part of a group and want to minimize talk by giving them less time to talk about who in the group is invited and who is not.
The second question that came up was how to address people. My feeling, after reading lots of wedding websites, was to address married couples as "Mr. and Mrs. John Doe." If Mr. and Mrs. Doe has children who are invited, it was, "Mr. and Mrs. John Doe and Family." Singles were addressed as "Ms. Jane Doe and Guest" or "Mr. John Doe and Guest, though we left off the "Guest" part for the STDs.
I'm thinking now, for the invitations, keeping it less formal when I know the names of both parties in couples. It feels weird when I know a couple as John and Jane and addressing them as Mr. and Mrs. John Doe, as if the woman doesn't deserve mention. I know I'm being a bit sensitive here, but it does irk me ever so slightly.
Anyways, I'm glad this task has finally been checked off my list! Yay!
Thursday, April 15, 2010
Make your own reusable ice pack
I had no idea it could be done this way.
http://www.thekitchn.com/thekitchn/how-to/how-to-make-your-own-lunch-box-ice-packs-113998
http://www.thekitchn.com/thekitchn/how-to/how-to-make-your-own-lunch-box-ice-packs-113998
Sunday, April 4, 2010

My first seder at home

It was not a traditional seder, but it was a seder nonetheless. We bought an apple, walnuts, eggs, horseradish root, Kedem kosher wine and Haggadahs all in preparation for this night. My fiance had already started on a box of matzoh this week, so we were good on the matzoh. We used his grandmother's crystal for our wine glasses and had his grandmother's seder plate on display. I helped to cook the food and I have to say that everything turned out very delicious!
The charoset was made with one very sweet green apple, a handful of walnuts, a splash of lemon juice and some kosher wine. It's a basic recipe and turned out very yummy! Everything was pulsed into a fine pulp in the food processor. I didn't measure everything out but I made sure I only used about a teaspoon to a tablespoon of lemon juice and enough kosher wine that it sweetened and moistened everything, but didn't cover up the taste of the apples and lemon.
I also roasted a hard boiled egg in the toaster oven to make the beitzah. I probably should have poked a few holes in the shell before I put it in the oven because it cracked dramatically while roasting! My fiance didn't mind it, saying that in his family, they don't eat the egg so it doesn't matter that it cracked. Well, since I would rather not waste food, once the seder was over, I ate the egg. Lol! There was a slightly smoky flavor to the egg and it was delicious in the salt water.
As for the bitter herb, we used horseradish. It was a big root and we only needed a little for the seder. So after my fiance cut out the portion he wanted to use, I made the rest into prepared horseradish to put into our mashed potatoes. It's actually very easy! After you skin the root, cut it up into pieces and pulse in the food processor until fine. Because fresh horseradish can make your eyes burn and make you really, really uncomfortable, you should grind horseradish outside or near an open window with a fan blowing. Our root was rather old and not very strong, so we just did it near the window. Once you have the horseradish ground fine, add enough vinegar to coat and a tiny pinch of sea salt to taste. It tasted wonderful! I don't think I'll ever have the store-bought stuff and be satisfied anymore! We did put a little of the prepared horseradish on the plate with the bitter herb for the hillel sandwich.
So then we sat with our haggadahs and did our very own seder. For the festive meal, we were so stuffed already, we just had some horseradish mashed potatoes. Basically mashed potatoes flavored with the fresh prepared horseradish I made earlier. It was so good, we stuffed ourselves on it and couldn't eat anything else for the meal! After the seder was over and everything washed and put away, we still had a lot of leftover matzoh.
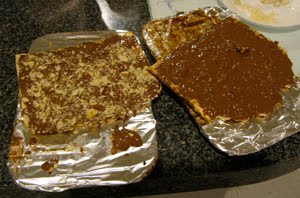
So I made some chocolate-covered matzoh! The method is very simple. Wrap an oven rack in foil and preheat the oven to 375 degrees F. Then take equal amounts of butter and brown sugar and boil it for three minutes in a saucepan, stirring constantly. Pour it over the matzoh and spread to coat. Then place the matzoh in the oven and reduce the heat to 350 degrees F. Keep an eye on the matzoh to make sure it doesn't burn. If it starts to burn, reduce the heat to 325 degrees F. and you can take the matzoh out for a bit to cool it down a little. Bubbling is okay though. Bake for about 15 minutes. Meanwhile, chop up some Toblerone chocolate, or whatever chocolate you have on hand, or use semisweet chocolate chips. Once the 15 minutes are up, take the matzoh out of the oven and spread the chocolate out on it. Wait a few minutes and begin spreading the melted chocolate to coat. Allow the matzoh to cool completely before enjoying. We actually ate half the matzoh before the chocolate cooled completely. Lol! It was soooooooo delicious!
Friday, March 26, 2010
Sorry for the long silence
Things got really busy and I just never got around to blogging for a while. I'm still busy and tired all the time, but not as much as I was. It's either that, or I've gotten used to being so busy!
Lately, I've been working longer hours at work and have been so busy at work that even though I don't get home very late, I'm bushed! On top of that, I have chorus rehearsal twice a week and it usually ends really late. So when I get home, I only have enough time to crawl into bed, thinking about how I have to get up early for work the next day.
Chorus always takes a lot out of me, but this year, I'm actually trying to practice more at home. That means I'm actually getting more tired practicing for Chorus than in previous semesters. This spring, my group has two big concerts to prepare for, so it's a lot of work. The piece that the director is most concerned about right now is Leonard Bernstein's Chichester Psalms. The first movement is really hard! Not only is it sung in Hebrew (a pretty difficult language to sing in), it's super fast and the measures have 7 beats rather than an even number.
Anyways, I've given my friend her veil and I hope she likes it! I still have pictures to post of it. I also have to make my own veil. My friend wanted hers trimmed to wrist length, but I think for mine, I'm going to make it a little longer and go for fingertip length. Once the veil is done, I can start putting together other projects.
So far I still have to:
- finish making the invitations
- make the hair flower
- make the bouquets and bouts
- make the bridesmaids gifts
- decorate the card box (I got a cardboard gazebo box from Amazon.com)
- sew my chinese dress
- make the centerpieces
I've decided that I'm going to make origami centerpieces. That way, it's easily portable and easily trashable. Making origami centerpieces fulfills the need for centerpieces at the wedding as well as the need to indulge in my love of origami! I remember with great fondness, spending hours folding pieces of paper, following the diagrams of instructions from japanese origami books borrowed from the library. I still buy origami books and instructional stuff when I see one I like, so this is a chance to put the hobby to good use! I'm planning to use some of the diagrams from Oriland.com.
Well, that's all I have to say on that for now.
Tuesday, February 23, 2010
The veil
Earlier in the month, my fellow bride friend and I went veil shopping. We went into the shop knowing a few things like, we didn't want the veil to compete with our dress or hair or fancy hair accessories. We also didn't want anything too expensive. To be honest, I thought there was a good chance that I would be making the veils for the both of us since it's almost always cheaper that way if the veil is simple.
So anyways, we walk into the store and they had some sample veils hanging around the room. For me, I wanted a fingertip length, oval cut veil with no edging. I think my friend wanted something rather similar, but we wanted to try veils on before we decided anything for sure. We had planned to go to a bunch of different stores, but as it turns out, our mind was made up after the first! We both ended up wanting a fingertip length veil, no edging and oval cut to get the cascading effect. Unfortunately, the veil we wanted was $125 and was gonna take a month to make!! It literally was nothing more than a big piece of tulle attached to a metal comb. It was amusing to see the sales lady try to justify it by saying it's "made to order" and it uses "special bridal illusion tulle." Yeah, the tulle is "special" in the sense that it's the sheerest weave of nylon webbing that's often used in bridal veils, but it's at most 2 dollars a yard!
So we thanked the lady for her time and went a few stores down to a bead shop. We bought some metal combs there for about $2.70 each. There are cheaper combs, but I ain't gonna quibble over a dollar when the alternative is $125! So then I went online and ordered 108 inch bridal illusion tulle for about $1.98 a yard from Fabric.com. I got other stuff that I need to fee my sewing hobby along with the tulle to get the free shipping. :-)
The tulle arrived last week and this past weekend, I made my friend's veil. Since it was the first veil I've ever made, I took it cautious and cut it too large. I figure it's better to have a veil I can trim rather than a veil I can't add to! To start, I folded two yards of the 108 inch tulle into quarters and cut a curve from open edge to open edge. When you open it, you get a big oval. I then sewed a running stitch in a line, a few inches off center so the shorter side will be the blusher and the longer side will be the back. Once I was finished stitching, I gathered the tulle on the thread and then sewed the gathered part to the comb. I think I forgot to mention I wrapped the comb in ribbon and glued the ribbon edges down with GemTac glue. This way, I can sew the tulle onto the ribbon and plus, it looks nicer.
So now the veil is almost done! See, since I cut the veil too big in an effort to be cautious and conservative, I now have to trim it. Once I get around to doing that the veil is done! I'll be posting pictures later.
Materials:
- 2 yards 108" bridal illusion tulle: $1.98
- 1 metal comb: $2.70
- 1 yard ribbon (you don't need nearly this much, but it doesn't hurt to have some more in case you want to wrap it a second time or you mess up): $0.75
- some thread
Equipment used:
- Self healing mat
- Rotary cutter
- measuring tape
- dressmaker pins
- hand-sewing needle
Some things to keep in mind when cutting the tulle:
- Tulle can get staticky, especially in the winter when the air is really dry. Rubbing a dryer sheet on it can help.
- Use those pins!
- Never iron tulle as the heat will melt the plastic
- You can relax wrinkles in the tulle by hanging it in the bathroom during a hot shower, or holding a steam iron close, but not touching the tulle, to steam out the wrinkles.
- The more you gather, the poofier the veil
- Oval cuts or curves will give you the cascading effect once the tulle is gathered
- Square cuts gathered in the diagonal middle will give you a "handkerchief" effect
- Cascading veils sometimes aren't poofy enough or are too sheer at the gathered area. To increase poof, fold the veil along the line you are going to gather it and sew your gathering thread a few millimeters to a centimeter from the fold. Sew the gathering thread through both layers and gather the tulle.
- If you have a long oval shape and want more poof, gather the tulle the long way rather than the short way and run the gathering thread through a fairly long length of tulle. If you're doing this, make sure that the tulle is the length you want it on both sides of the gather.
- Tulle is cheap. If you're not sure what you're doing, buy a few extra yards and experiment!
Friday, February 19, 2010
School laptop horror

Apparently, a high school in a pretty wealthy district issued laptops to all their students with the ability to turn the webcam on and off remotely, and didn't tell the kids. When kids asked the school tech guy why the webcam light turns on and off randomly, he replied that it was a glitch or it had something to do with people logging on and off. So the story blew up when the vice principal decided to discipline a student for "improper behavior" in the kid's own home and showed a photo taken by the laptop's webcam as proof. Creepy much? So far, the school has admitted that they have the ability to spy on kids via the issued laptops in their homes, but denies any wrongdoing.
From what I can tell, this has to violate federal wiretapping laws, the constitutional right to "reasonable expectations of privacy" in one's home, and even child pornagraphy laws. I really hope the people who implemented, defended and covered for this get put away for a really, really long time.
http://www.boingboing.net/2010/02/17/school-used-student.html
Monday, February 8, 2010
No 'poo movement
I am now officially a part of the No 'poo movement! It's a terrible name for a trend where people give up using shampoo and conditioner. My hair actually feels pretty good and I have no plans of going back to using shampoo anytime soon. It's been a gradual journey to this point.
The first thing I gave up was conditioner. I started using a cider vinegar hair rinse, which is about one tablespoon cider vinegar to a cup of water. You basically use that to rinse your hair after shampooing. My fiance generally hates the way it makes the bathroom smell like a salad bar, but fortunately, he doesn't shower the same time I do so he can avoid the bathroom after I'm done. :-)
Then I switched from shampoo to a shampoo bar. The shampoo bar is made from vegetable oils and contains no weird chemicals on its ingredients list. It can actually be used all over the body and is great for travel! At first, it was kind of weird to rub a block of soap on my head, but I got used to it. Once my hair got used to the soap, I realized that the soap was pretty moisturizing and I didn't need to use the cider vinegar rinse afterwards.
Once my shampoo bar ran out, I had a choice of either purchasing another or dropping shampoo altogether. I decided to at least try the No 'poo route. I dissolved a tablespoon of baking soda in a cup of water and poured it into a squeeze bottle. I worked it into my hair after wetting it and the mix felt slippery and slick. For this first time, I decided not to use the vinegar rinse to see if I even needed it. As it turns out, my hair felt a bit rough and scaly once it dried. So the next time, I used the vinegar rinse and the issue was solved.
I understand that not everyone can take this plunge and I don't generally tell people I meet that I wash my hair with baking soda and vinegar. I get strange looks when I tell people. I remember a few hair stylists telling me I have very healthy and shiny hair. On rare occasions, someone will ask me what I use in my hair and when I tell them, they fall silent and act rather awkward. The thing is, if my hair didn't feel nice and clean, I would not be continuing to wash my hair with baking soda and vinegar. It just so happens that this method works well for me. I like what it does for my hair and I like the fact that it's inexpensive AND it's not a weird chemically substance!
Hot or Cold rice sock
This was something I actually learned from a Martha Stewart magazine many years ago, but has been travelling the "green" sites of late. Take a sock, preferably a knee high or other long sock and fill it with dry, uncooked rice. You can either sew it closed or knot it closed. For a hot pad, place it in the microwave for a few minutes. For a cold pad, place in the freezer and leave it there until you want to use it.
I personally have never used it as a cold pad. As a hot pad, it holds its warmth for about 30 minutes or longer. The rice molds itself to whatever body part it's placed upon and its heavy weight feels comforting to me. I've reused the rice sock many times over the year and it can feel really good to drape a warm one around your neck after a long day of staring at the computer screen. I've never opened the sock later to eat the rice inside though I've wondered about that. Lol!
I personally have never used it as a cold pad. As a hot pad, it holds its warmth for about 30 minutes or longer. The rice molds itself to whatever body part it's placed upon and its heavy weight feels comforting to me. I've reused the rice sock many times over the year and it can feel really good to drape a warm one around your neck after a long day of staring at the computer screen. I've never opened the sock later to eat the rice inside though I've wondered about that. Lol!
Tuesday, February 2, 2010
Whole wheat No Knead bread
I finally jumped on the No Knead bread craze and made some of my own! I used a whole wheat recipe and replaced some of the whole wheat flour with 2 to 3 tablespoons of vital wheat gluten to help with the rise. I used the recipe from here:
http://www.nytimes.com/2008/10/08/dining/082mrex.html
I left out rye flour and the cornmeal and reduced the amount of salt. Even so, I thought the loaf came out a bit too salty. My fiance loves it though. I do have to say, that this recipe has produced the nicest, crusty crust of any whole wheat bread recipe I've tried. It's hard to get a good crusty crust on whole wheat breads, even with cold water brushing and and water bath on the lower rack. So, I am very impressed with this bread. I think next time, I'll reduce the amount of salt even more and add just a touch of sugar.
Made yogurt!
I've recently gotten into the groove of having some yogurt every morning. After a while, it starts to get a little pricey. I don't need anything fancy. Just some plain yogurt mixed with a small amount of fruit, or sugar, or maple syrup will do for me. What really cinched the decision to make my own was when I found out that many of the commercial nonfat yogurts contain gelatin, which isn't very good for my vegetarian practice. So this past weekend, I decided to try making my own yogurt! It was surprisingly easy!
First thing you'll need is a pot to make your yogurt in, and a thermometer and metal stirring spoon. Then you'll need some room-temperature milk. It can be whole, part skim or skim milk. Keep in mind that the fattier the milk, the thicker the texture. Next, you'll want to have some room-temperature yogurt with live, active cultures.
In the pot, heat the milk to 185 degrees F to kill any unwanted bacteria, stirring constantly. If you're using nonfat milk and would like to try for a thicker consistency, you can keep the milk at this temperature for about 30 minutes to boil off some water. Then take the pot off the heat and let the milk cool down to 110 degrees F. This is a good temperature for yogurt bacteria to grow. Place the pot near a heater or on a heated pad. Stir in 2 to 3 tablespoons of your yogurt. Then you just keep the pot covered and warm and wait for at least 7 hours. The longer you wait, the tangier and thicker the result. If you see any greenish stuff on the surface, it's okay. Just leave it alone and once it's done, stir to mix everything together evenly.
Once you're satisfied it's done, stir vigorously to mix everything, then pour into containers and leave in the fridge overnight. It will thicken a bit more once it's chilled. The yogurt will keep for about 2 to 3 weeks. Remember to save a few tablespoons of your yogurt for your next batch!
Monday, February 1, 2010
Difficult people
Let's talk about wedding envy in others. In my personal life, the only people who've shown signs of envy are people who are not yet engaged or are otherwise still single. For the ones that are not in a steady relationship, my wedding planning brings up feelings of loneliness and inadequacy. I've been in that position myself, so I know it can be hard. For the ones that are in a steady relationship, on the road to marriage themselves, it seems that they are envious of the attention they are not getting. I admit that I know some pretty self-absorbed people who are used to my being content to stay in the background. My relationship with these self-absorbed folks had been manageable until I was suddenly thrust forward in front of them as dictated by societal norms and traditions. On the surface, they can't show that they're not happy for me and my fiance, but that doesn't mean they don't find ways to inject their displeasure or find petty ways to make me feel small and deflated.
Now, I try to be a nice person. I'll let stuff go if I know someone's having a hard time, but being a faulty human being, I have a limited amount of patience and grace. Normally, with difficult people, I'll start distancing myself from them. The less exposure to a nasty person, the less stress I'll feel. Difficult people become more of an issue when you're stuck dealing with them - when you can't escape! Examples would be when family members force you to take on a bridesmaid you don't get along with or a mother that treats your wedding like it's hers, or a vendor that gets nasty as soon as you sign the contract. I'm not dealing with these particular issues myself, but I do have people involved in my wedding planning process that I can't get away from. These few people have caused me and my fiance to worry about how our wedding will turn out.
When I encounter people who don't react well to my wedding, I realize that the issue isn't with me or my wedding. The issue is with them. This may be a harsh thing to say, but I think it's true. I didn't go around announcing my engagement unless I thought that person would be hurt that I didn't tell them. I never showed anybody my ring unless asked and I don't bring up wedding plans unless I have to or am asked. So all in all, I think it's safe to say that I didn't rub my happiness in anybody's unhappy face. Despite my best efforts to be sensitive, some people still react with negativity.
So who ARE these negative people in my life? Well, the common feature among the worst of them are that they're self-absorbed, attention-seeking, materialistic or image-conscious types. I am not sorry that my fiance and I will be the center of attention on our wedding day, and they'll just be the supporting cast. However, this prospect seems to cause them to lash out at us. My fear, and this is where I give them too much power over me, is that they will somehow find a way to bring me down on my own wedding day. I am aiming to have fun. These nasty people are... difficult to gain any distance from and I just don't want to be looking at their unhappy faces and hearing their snide comments on my wedding day. I am also fearful that they're going to somehow steal the spotlight. I am usually content to stay in the background and follow someone else's lead, but that doesn't mean I don't like positive attention and praise.
Now, you might be wondering if I've spoken to these people about their snarky pettiness. In the beginning, I let it go. These days, I push back. Thus far, pushing back has only resulted in more negativity, drama and stress. Now, they're actually mad at me and my fiance and I don't know where these relationship will end up on the day we get married.
So right now, I'm trying to not care about these people anymore. If I care about someone, I care about their opinions. They have already shown that they don't care about my feelings so I should stop caring about what comes out of their mouth. This is a lot harder said than done, but since the only person I have any amount of control over is me, I'll have a higher chance of success with this route than the confrontational one. The other thing I want to do is to tell the MC and DJ that they are not to give the microphone to anybody under any circumstances! All speeches can be made at the rehearsal dinner so we can spare the wedding!
Tuesday, January 26, 2010
Battle of the Bulge check-in
Goal:
- Exercise 20 minutes per day
- Stay within calorie range per day
- Drink 5 cups of water per day
- Do at least 10 minutes of yoga per day
- Make effort to walk around office floor once every hour
Pennies earned:
54
I am now over halfway to a whole dollar! As you can see, I've added a fifth goal this week. I want to try to keep active even at my desk job. Truly, I didn't really start to gain lots of weight until I started sitting on my rear for most the day, every day! I'm hoping that forcing myself to just walk around my office floor once every hour will help mitigate some of my mid-section spread. In terms of everything else, I'm still having a bit of trouble building consistency . I am also having some problems fitting in a balanced diet that doesn't go over my calorie limit. I blame it on my sweet tooth and my love cheese. Oh how I love cheese!
What's a bit discouraging is that after all time time, there is no progress yet. I did lose an inch around my hips, but my weight and everything else is still the same. I'm starting to lose my motivation. If I don't start to see results soon, I'm not sure I'll want to continue this much longer. I mean, if all this effort doesn't amount to anything, then why bother making the effort, right?
Thursday, January 21, 2010
Battle of the Bulge check-in
Goal:
- Exercise 20 minutes per day
- Stay within calorie range per day
- Drink 5 cups of water per day
- Do at least 10 minutes of yoga per day
Pennies earned:
41
I haven't posted one of these in a while. As you can see, I really haven't gotten anywhere since the holidays started. I should have earned a great deal more pennies by now, but it's been difficult getting back on track. However, I'm trying keep myself accountable with these posts, for honesty's sake, the above is where I am.
I did add a new goal though. This is to encourage me to maintain and increase my flexibility as I continue to try to keep to an exercise routine. Plus, I just love the way my body feels when I do it regularly. I may increase the number of minutes but for now, 10 minutes will do.
DIY stone bath mat
A stone bath mat is definitely an interesting project. Personally, I like a fluffy mat, but if you prefer stone, you can make one yourself with the tutorial linked below! I really like the looks of this project and am considering making a welcome mat version.
http://www.lowescreativeideas.com/idea-library/projects/stone_bath_mat_0110.aspx
http://www.lowescreativeideas.com/idea-library/projects/stone_bath_mat_0110.aspx
Wednesday, January 20, 2010
Lemon powered battery

http://www.mnn.com/family/education-activities/blogs/how-to-make-a-lemon-battery
Subscribe to:
Posts (Atom)