I had heard about this oil cleansing method a while back, but I never got into it. I had my favorite cleanser for my face and I was happy with it. The cleanser didn't take off stubborn makeup, but it worked well for days without makeup, which is most days. So not having a need for change, I didn't bother changing my routine.
Lately, I've been using makeup more. I don't know why, but lately, I feel like I would like to not look dowdy all the time. At the very least, I'd like my face to look less splotchy. So these days, I've been using BB cream every morning. BB cream is the latest makeup fad because it moisturizes, primes and evens out skin tone at the same time. Most also contain anti-aging stuff and ingredients that are supposed to be nourishing for your skin. I originally bought an American BB cream, and though I liked it, it was more like a tinted moisturizer and didn't give me the coverage I needed on some days. So I switched to a Korean brand and though still light on my face, does seem to have a bit more coverage. I also only buy BB creams that have SPF using titanium or zinc oxide as its sunblocking ingredient.
So now that I have makeup on my face, I really would rather not have to remove the makeup and then wash my face with a cleanser, which is what I used to do. I want that whole deal to be a one step process. Enter the oil cleansing method. I've already been using extra virgin olive oil on my face to remove makeup. Why not just use it as an every day cleanser? The method is easy. I just rub olive oil into my face, massaging the skin and making sure to get it onto any eye makeup without getting it into my eyes. After a minute or so of that, I wet a soft face cloth with hot water and place it over my face until it cools. Then I gently wipe the stuff off my face. If I didn't get everything the first time, I'll rinse the cloth with hot water, place it over my face again until it cools and wipe. Then I wash my face cloth and hang it dry. All done!
There are a couple of nice things about this method. First, it cleanses and removes makeup in one step. Second, it actually moisturizes the face enough that you don't have to put on extra lotion before bed. You still can if you want to, as I do when I have an eczema patch to take care of, but if my face is feeling healthy, I don't bother with lotion.
If you have oily skin, you can add castor oil. A good blend to start with is 80% olive oil and 20% castor oil. You can also try substituting olive oil for sunflower seed oil, grapeseed oil, jojoba oil or sweet almond oil. Some experimentation might be involved to find the oil combination you like best. You can even add aloe water or aloe juice to your blend. Just shake the bottle well before applying.
For me personally, I don't mind making a cleansing oil blend and getting creative. However, the truth is that I'm lazy and I want to keep things simple. What's easier than simply pouring olive oil into a small bottle? I always have olive oil in the house so there's no need to specially buy something for my face, and there's no measuring or mixing. Just pour the oil into a small bottle and place in the bathroom. Can't get much simpler than that!
Showing posts with label Beauty. Show all posts
Showing posts with label Beauty. Show all posts
Wednesday, April 24, 2013


Tuesday, November 20, 2012
Current makeup collection
Since the Great Makeup Purge, I've given a lot of thought to streamlining my makeup routine. I want to reduce the number of steps and the time it takes to apply. I also want to buy new makeup, but I only want to purchase stuff I'm going to use.
So going back online, I discovered the newest makeup rage - BB Creams! Apparently in Asia, they're already using something that combines moisturizer, SPF, primer and foundation. Beauty balm, or BB creams are now being sold in the U.S. and I really wanted to try it out. I ended up getting a really expensive tube of Dr. Jart+ Premium Beauty Balm with SPF 45. This tube does have titanium and zinc oxide so at least some of the SPF is an actual physical sunblock rather than the less effective chemical block.
So since getting this tube, I've used it a few times and here's what I think so far. When it first goes on, it feels clammy on the skin, but that goes away. It really does smooth out the skin tone, but it's not a concealer if you've got really dark under-eye circles. The pigment does not settle into lines or creases. It does not look caked on or shiny. A little goes a long way. It really does last all day, and I really like it! I am throwing out my face primer and foundations. Still keeping my dusting powder though as I'm not sure how shiny I'll look in the summer. I'm also keeping my Urban Decay Primer Potion for my eyes, since the BB cream doesn't keep my eye makeup from straying. I am throwing out my blush since I have red cheeks and this cream doesn't cover that up, but keeping my Neutrogena bronzer for contouring.
Now that my face is moisturized, primed and even, I can add colors. I threw out pretty much all of my eye makeup and lipstick, so at first, I thought I should get a combo palette. That way I only need to go to one item for colors. However, none of the combo palettes really included everything I wanted or needed. A lot of combo palettes included what I wanted and needed plus a lot of stuff I didn't want or need. I never did find the perfect combo palette for eyes and lips. So I decided to get separate palettes.
For my eyes, I considered getting something small with only 4 coordinating colors, but I like having more choices. I also wanted neutral colors, suitable for any occasion. However, the colors can't be so neutral that I can't add drama if I wanted to. I decided on getting Urban Decay's Naked2 palette. It comes with 12 colors, a 2 ended brush and a small tube of lip gloss. I tossed the lip gloss, but I love everything else in it! The colors are beautifully saturated and go on smooth. I love the shimmer colors and the fact that a really black pigment was included in this. Although 12 colors is a lot to choose from, the palette is very neutral. I may supplement later with a couple of colors in my favorite shades of purple and wine.
Aside from eye shadow, I also got a waterproof liquid liner. I really suck at applying liquid liner, but I seem to be having good luck with the ones that come in pencil form with a stiff, pointy brush. The one I have is Stila All Day Waterproof Liquid Liner. I also have a regular pencil liner because I am more confident in my skills with that, but unfortunately the pencil always smudges for me so I may toss this eventually. As for mascara, I have to say I haven't found one that I really like. I have short, sparse lashes that resists curling. I also have sensitive eyes and they water a lot. Right now, I'm using Blinc mascara because I got a sample of it and it doesn't irritate, flake or rub off. However, it doesn't do anything impressive for my lashes and doesn't hold curl. Previously, I tried using Fiberwig, which does a great job lengthening, but nothing else. I've tried random other ones from the drugstore as well but so far, nothing really sticks out.
Next, I thought about lip color. The problem with lipstick is that it's usually gone after my first cup of coffee. The problem with long-lasting lipstick is that it dries your lips out like crazy! Most long-lasting lipsticks come with a gloss to keep your lips moisturized. However, the whole point of getting long-lasting stuff is so I don't have to do touch-ups. Still, my experience with long-lasting lipstick has been good as long as my lips are hydrated to begin with. So I have one shade of the long-lasting stuff, the Revlon Colorstay Overtime Lipcolor. This thing does dry my lips and it feels a bit sticky, but it really does last and last. In my makeup trials, I have also tried Max Factor Lipfinity, which has beautifully saturated colors, goes on matte, but it dries out my lips more than anything I've ever used! As for regular lipstick, I have my all-time favorite Clinique Almost Lipstick in Black Honey. I discovered Black Honey in high school and I just never fell out of love with it.
So in total, here's what I have:
BB Cream
Matte bronzer (for days when I actually think I might learn to contour my cheeks or something)
Translucent Finishing powder
Eye primer
1 Eye palette
1 black waterproof liquid eyeliner
1 black eyeliner pencil
1 waterproof mascara
1 long-lasting lipstick
1 regular lipstick
A note on makeup remover:
I wear waterproof makeup on my eyes because I tear a lot and my eye makeup tends to smudge, fade and flake off. The easiest way to remove makeup, including waterproof makeup and falsies, is to rub extra virgin olive oil onto the skin and lashes, wait a few minutes, and then gently wash off with soap and water. You can use a cotton ball to apply the oil or you can use a reusable makeup sponge. I used olive oil as my makeup remover after all my makeup trials for my wedding, as well as after my wedding. It works like a charm and it doesn't leave your skin feeling stripped the way some makeup removers do.
Final note for this post:
For a while, I wanted to make my own makeup from ingredients I can pronounce. I did have some success with tinted lip balm, some eye shadows and a loose powder foundation. However, it takes a lot of experimentation to get a likeable formula. Plus when I ran out of something homemade, I had to take the time to make it again. At this point in my life, I am too lazy, unmotivated and busy to take the greenie route when it comes to makeup. I still make my own lotions and my skincare routine is pretty simple and free of weird chemicals. Given that, I think rubbing a little toxic artifice onto my face isn't the most terrible thing in the world as long as I limit my purchases and always wash the stuff off at the end of the day. :-)
So going back online, I discovered the newest makeup rage - BB Creams! Apparently in Asia, they're already using something that combines moisturizer, SPF, primer and foundation. Beauty balm, or BB creams are now being sold in the U.S. and I really wanted to try it out. I ended up getting a really expensive tube of Dr. Jart+ Premium Beauty Balm with SPF 45. This tube does have titanium and zinc oxide so at least some of the SPF is an actual physical sunblock rather than the less effective chemical block.
So since getting this tube, I've used it a few times and here's what I think so far. When it first goes on, it feels clammy on the skin, but that goes away. It really does smooth out the skin tone, but it's not a concealer if you've got really dark under-eye circles. The pigment does not settle into lines or creases. It does not look caked on or shiny. A little goes a long way. It really does last all day, and I really like it! I am throwing out my face primer and foundations. Still keeping my dusting powder though as I'm not sure how shiny I'll look in the summer. I'm also keeping my Urban Decay Primer Potion for my eyes, since the BB cream doesn't keep my eye makeup from straying. I am throwing out my blush since I have red cheeks and this cream doesn't cover that up, but keeping my Neutrogena bronzer for contouring.
Now that my face is moisturized, primed and even, I can add colors. I threw out pretty much all of my eye makeup and lipstick, so at first, I thought I should get a combo palette. That way I only need to go to one item for colors. However, none of the combo palettes really included everything I wanted or needed. A lot of combo palettes included what I wanted and needed plus a lot of stuff I didn't want or need. I never did find the perfect combo palette for eyes and lips. So I decided to get separate palettes.
For my eyes, I considered getting something small with only 4 coordinating colors, but I like having more choices. I also wanted neutral colors, suitable for any occasion. However, the colors can't be so neutral that I can't add drama if I wanted to. I decided on getting Urban Decay's Naked2 palette. It comes with 12 colors, a 2 ended brush and a small tube of lip gloss. I tossed the lip gloss, but I love everything else in it! The colors are beautifully saturated and go on smooth. I love the shimmer colors and the fact that a really black pigment was included in this. Although 12 colors is a lot to choose from, the palette is very neutral. I may supplement later with a couple of colors in my favorite shades of purple and wine.
Aside from eye shadow, I also got a waterproof liquid liner. I really suck at applying liquid liner, but I seem to be having good luck with the ones that come in pencil form with a stiff, pointy brush. The one I have is Stila All Day Waterproof Liquid Liner. I also have a regular pencil liner because I am more confident in my skills with that, but unfortunately the pencil always smudges for me so I may toss this eventually. As for mascara, I have to say I haven't found one that I really like. I have short, sparse lashes that resists curling. I also have sensitive eyes and they water a lot. Right now, I'm using Blinc mascara because I got a sample of it and it doesn't irritate, flake or rub off. However, it doesn't do anything impressive for my lashes and doesn't hold curl. Previously, I tried using Fiberwig, which does a great job lengthening, but nothing else. I've tried random other ones from the drugstore as well but so far, nothing really sticks out.
Next, I thought about lip color. The problem with lipstick is that it's usually gone after my first cup of coffee. The problem with long-lasting lipstick is that it dries your lips out like crazy! Most long-lasting lipsticks come with a gloss to keep your lips moisturized. However, the whole point of getting long-lasting stuff is so I don't have to do touch-ups. Still, my experience with long-lasting lipstick has been good as long as my lips are hydrated to begin with. So I have one shade of the long-lasting stuff, the Revlon Colorstay Overtime Lipcolor. This thing does dry my lips and it feels a bit sticky, but it really does last and last. In my makeup trials, I have also tried Max Factor Lipfinity, which has beautifully saturated colors, goes on matte, but it dries out my lips more than anything I've ever used! As for regular lipstick, I have my all-time favorite Clinique Almost Lipstick in Black Honey. I discovered Black Honey in high school and I just never fell out of love with it.
So in total, here's what I have:
BB Cream
Matte bronzer (for days when I actually think I might learn to contour my cheeks or something)
Translucent Finishing powder
Eye primer
1 Eye palette
1 black waterproof liquid eyeliner
1 black eyeliner pencil
1 waterproof mascara
1 long-lasting lipstick
1 regular lipstick
A note on makeup remover:
I wear waterproof makeup on my eyes because I tear a lot and my eye makeup tends to smudge, fade and flake off. The easiest way to remove makeup, including waterproof makeup and falsies, is to rub extra virgin olive oil onto the skin and lashes, wait a few minutes, and then gently wash off with soap and water. You can use a cotton ball to apply the oil or you can use a reusable makeup sponge. I used olive oil as my makeup remover after all my makeup trials for my wedding, as well as after my wedding. It works like a charm and it doesn't leave your skin feeling stripped the way some makeup removers do.
Final note for this post:
For a while, I wanted to make my own makeup from ingredients I can pronounce. I did have some success with tinted lip balm, some eye shadows and a loose powder foundation. However, it takes a lot of experimentation to get a likeable formula. Plus when I ran out of something homemade, I had to take the time to make it again. At this point in my life, I am too lazy, unmotivated and busy to take the greenie route when it comes to makeup. I still make my own lotions and my skincare routine is pretty simple and free of weird chemicals. Given that, I think rubbing a little toxic artifice onto my face isn't the most terrible thing in the world as long as I limit my purchases and always wash the stuff off at the end of the day. :-)
Sunday, November 18, 2012
Makeup purge
For many years, I had a Kaboodle box that housed all my makeup, or at least it tried to house all my makeup. Like a lot of other women, I like to wear makeup sometimes. Personally, I am more of a shopper of makeup than a wearer of makeup. I love going to Sephora and drug stores to look through the makeup aisles and imagine the product's potential on my face. I can't tell you how much money I've spent on makeup I've never used up, but I can tell you it's a lot!
So one of the things I've done recently is to clean out my makeup collection. First, anything that was really old and expired got thrown out. I never wear nail polish anymore so I threw that stuff out next. Then came the hard part. I had some lip colors that I love, but rarely wear. Same with eye shadows. It's almost as if I enjoy the idea of wearing these colors more than I like actually wearing them. Sort of like being in love with the idea of being in love more than actually wanting to be in love. Anyways, it took some time to sort through the colors to figure out which ones I would actually wear and which ones I would not wear but like to think that I would eventually wear one day. These are usually very saturated colors like metallic green and iridescent blues.
The truth is, I don't know how to apply makeup well. Since I normally don't wear makeup, I don't get a lot of practice. So in trying to figure out which colors to keep, I ended up considering which ones I actually had the skills to apply without making myself look like a clown. So most of my eye and lip makeup ended up in the trash. Once I got into the groove of throwing stuff out, I was tempted to just tip the whole box of makeup into the trash and swear off makeup forever, but I knew that wasn't going to happen.
Anyways, then I had to look through my foundations and brushes. Yes, I bought brushes because I imagined I would one day practice enough to learn how to use them. What I realized is that my sucky skills aren't helped with brushes. However, I like brushes because I can clean them and reuse them, unlike a lot of sponge applicators. Anyways, I had a couple of bottles of foundation, plus primer, finishing powder, eye primer, plus mineral powder foundation. I almost never use this stuff. I keep it around for fancy events or when I actually feel like I have time to put on makeup.
So just to note, I have all this stuff because in the past, makeup always either ran, smudged or faded really fast. Reading makeup tips online (thank you internet!) I found that if you put on primer first, then foundation, then dusted with some kind of "finishing" powder, the makeup will last longer. Apparently, there is also a separate primer for the eyes. So yeah, on days where I had to put on makeup, I'd spend almost 30 minutes just putting crap onto my face. A full blown routine would look something like this:
1. Moisturize
2. Primer
3. Foundation
4. Eye Primer
5. Eye shadow (this could take several minutes depending on the look you want)
6. Eye liner
7. Dust face with powder
8. Mascara
9. Blush
10. Lipstick
Then of course, you gotta do your hair, which I usually just tie back and call it done. Lol!
So going through my makeup collection also made me really want to streamline my makeup routine. I would wear makeup more often and waste less of it if it were less of a hassle to put on. So after throwing out so much stuff that I barely had any makeup left, I thought about how to acquire makeup more wisely going forward. That's in the next post!
So one of the things I've done recently is to clean out my makeup collection. First, anything that was really old and expired got thrown out. I never wear nail polish anymore so I threw that stuff out next. Then came the hard part. I had some lip colors that I love, but rarely wear. Same with eye shadows. It's almost as if I enjoy the idea of wearing these colors more than I like actually wearing them. Sort of like being in love with the idea of being in love more than actually wanting to be in love. Anyways, it took some time to sort through the colors to figure out which ones I would actually wear and which ones I would not wear but like to think that I would eventually wear one day. These are usually very saturated colors like metallic green and iridescent blues.
The truth is, I don't know how to apply makeup well. Since I normally don't wear makeup, I don't get a lot of practice. So in trying to figure out which colors to keep, I ended up considering which ones I actually had the skills to apply without making myself look like a clown. So most of my eye and lip makeup ended up in the trash. Once I got into the groove of throwing stuff out, I was tempted to just tip the whole box of makeup into the trash and swear off makeup forever, but I knew that wasn't going to happen.
Anyways, then I had to look through my foundations and brushes. Yes, I bought brushes because I imagined I would one day practice enough to learn how to use them. What I realized is that my sucky skills aren't helped with brushes. However, I like brushes because I can clean them and reuse them, unlike a lot of sponge applicators. Anyways, I had a couple of bottles of foundation, plus primer, finishing powder, eye primer, plus mineral powder foundation. I almost never use this stuff. I keep it around for fancy events or when I actually feel like I have time to put on makeup.
So just to note, I have all this stuff because in the past, makeup always either ran, smudged or faded really fast. Reading makeup tips online (thank you internet!) I found that if you put on primer first, then foundation, then dusted with some kind of "finishing" powder, the makeup will last longer. Apparently, there is also a separate primer for the eyes. So yeah, on days where I had to put on makeup, I'd spend almost 30 minutes just putting crap onto my face. A full blown routine would look something like this:
1. Moisturize
2. Primer
3. Foundation
4. Eye Primer
5. Eye shadow (this could take several minutes depending on the look you want)
6. Eye liner
7. Dust face with powder
8. Mascara
9. Blush
10. Lipstick
Then of course, you gotta do your hair, which I usually just tie back and call it done. Lol!
So going through my makeup collection also made me really want to streamline my makeup routine. I would wear makeup more often and waste less of it if it were less of a hassle to put on. So after throwing out so much stuff that I barely had any makeup left, I thought about how to acquire makeup more wisely going forward. That's in the next post!
Monday, February 27, 2012
Curls
I have always wanted big, wavy curls, but alas I am Asian and Asians generally have thick, straight hair. In my envy, I have tried sleeping with my mom's curlers, perming my hair (which was a disaster) and using curling irons and 1 inch flat irons. All gave me a measure of success but it was so much work! Well, the perm wasn't a lot of work on my part, but it wasn't good for me because my hair started falling out afterwards. I never went for a perm again.
In the end, as much as I want curls, I hate the idea of applying heat to my hair, as with hot irons and hot curlers. So that is why I am super interested in trying this out:
http://www.cutegirlshairstyles.com/tips-and-tricks/sock-curls-no-heat-curl-hairstyles/
It's okay if the curls don't last. I'd only be doing it for fun anyways. :-)
In the end, as much as I want curls, I hate the idea of applying heat to my hair, as with hot irons and hot curlers. So that is why I am super interested in trying this out:
http://www.cutegirlshairstyles.com/tips-and-tricks/sock-curls-no-heat-curl-hairstyles/
It's okay if the curls don't last. I'd only be doing it for fun anyways. :-)
Saturday, December 25, 2010
Homemade lipstick

I suppose you can make any homemade lip balm into a lipstick using enough colorant. I tried that once and although the result was a tube of very deeply colored lipstick, it went on my lips more like a sheer lip balm. So today, I decided to try a different formula.
8 parts castor oil (this makes for a shiny lipstick)
1/4 part beeswax
1 part candelilla wax
1/4 part vitamin E oil
3 parts beet root powder (pink colorant)
1 part alkanet root powder (purple colorant)
1/2 part titanium dioxide (makes the color less sheer and more matte)
Most instructions will tell you to mix this is two phases: the wax and oil phase and the colorant phase. First, you melt the oil and wax and then in a separate container, mix the colorant with some castor oil. Mix the colorants into a smooth paste and mix everything together. Make sure to mix well so everything is smooth. Work quickly for as the mixture cools, it hardens. When you're done mixing, pour into liptstick tubes or lip pots.
I was lazy and just melted the oil and waxes first and then dumped the powder colorants in. I made enough for two tubes. You can make your own natural colorants by dehydrating beet root and alkanet root and pulverizing them in a food processor. There is some sacrifice in texture in going this route, which I will explain in a moment. Here is what the lipstick looks like on my lips:
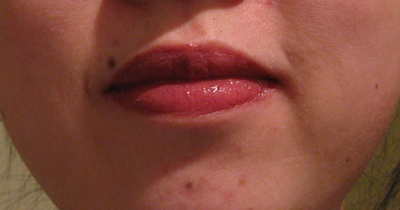
I will say that the lipstick went on feeling a bit gritty. I suppose that is what happens when you don't use very fine colorants such as mica or iron oxides. I suppose I could also have just run the colorants in a food process to see if I could get the texture more fine, but again, I'm too lazy for that. In any case, it's not unbearably gritty and you don't feel the grit once it's on. Right now, I very much like this formula and this color.
I would not use this as a blusher because the little bits of alkanet root will sometimes stand out and make you look like you have dirt on you. For a powder blush, it' probably best to use a very light dusting of beet root powder. For a matte look and some oil control, add a bit of cornstarch to the powder. To make the color a bit more brown, add a little bit of cocoa powder. I have yet to mix a shade of blush that I think looks good on me, but I haven't tried very often. Lol!
One last thing before I sign off. If you just want clear shiny lip gloss, just rub some pure castor oil on your lips. If you want a little tint to your lip gloss, you can try grinding the beet root powder really fine and add that to the oil.
Tuesday, August 3, 2010
My first manicure, pedicure and facial
I've only recently decided that I like getting massages and I've only had 3 or 4 massages so far. I guess you can probably say that I'm not much of a spa goer. A few months ago, my friend convince me to buy a groupon to La Peau Day Spa for their Diamond Facial treatment with mani pedi combo. It was a pretty good deal since the treatments without discounts are $205, but the groupon was only like 65. Since we were still expected to pay tax and 20 percent gratuity on the full amount rather than the discounted price, that brought the total cost up to about $106. So in the end, it wasn't cheap, but it didn't hurt that much because we paid the 65 up front for the groupon and then the rest when we got the treatment.
The staff was pretty friendly and nice though I'm not sure I appreciate all the Chinese being spoken around me. It's not that I don't understand it, I just think it's rude. I've always thought it was rude to be speaking another language around someone who doesn't understand it. Even if you're not talking about the person who doesn't understand, it's not okay because it makes the person left out feel awkward and uncomfortable. As hosts, meaning the staff, you should not be doing that to your guests, meaning the clients. This is something I think a LOT of asians don't get. Anyways, back to the spa.
So we do the facial first. The lady tells me that I will notice a visible difference in my skin after the facial is done. She preps my face with some creams and rubs and then wipes it off before starting on the diamond facial. So I'm guessing it's the "diamond" is machine that she used to scrape a few layers of skin off my face. It didn't hurt and it wasn't uncomfortable. After that, some more creams were slathered on my face and some more massaging. Then she puts on a mask and leaves me in the room for about 25 minutes. This is the part that I really didn't enjoy. I was so incredibly BORED! I wasn't tired enough to fall asleep and there was nothing to do but lie there with the mask on and a wet towel over my eyes. I tried to do some meditating, but I kept feeling the urge to sit up to do it. For some reason, I felt it really difficult to meditate in that room in the position I was in. Anyways, eventually, I took off the wet towel over my eyes and looked around. I started to suspect that every time they wipe my face, they've used a plain, wet paper towel. Anyways, so at the end, she came back and wiped the mask off, put some lotion on and sent me to the mani pedi room.
I went to the bathroom before going to the next treatment and checked out my face. Did it look noticeably better than before? Not really. Looking closer, I don't think the texture got any smoother and I didn't think my scars and other discolorations got any lighter. However, I thought I'd take another look when I get home and see how I feel then.
So on to the mani pedi! First, let me say I am not impressed with their idea of sanitary conditions. The foot bath has rust on the metal parts and I know for sure they don't clean the bath between clients. On top of that the service I got, though friendly, was not the most professional. Part of that is because of all the talking in another language, know there were people who didn't understand, and part of that was feeling like they were paying more attention to chitchatting than actually making sure they didn't get nail polish on my skin. It's not terrible, but I just feel like they could have done a better job. I really didn't feel more relaxed or pampered after the mani-pedi.
So in conclusion, I'd say the experience was not an impressive one. Lol! I might get another facial some day because I think it feels nice when my face is massaged, but I can't say I see any reason to get a manicure or pedicure. Of course, maybe it just wasn't a great experience at this facility. There might be other places that do a better job. I suppose I can give it another shot some other time and see how I feel then. At least, now I can say I've done it!
The staff was pretty friendly and nice though I'm not sure I appreciate all the Chinese being spoken around me. It's not that I don't understand it, I just think it's rude. I've always thought it was rude to be speaking another language around someone who doesn't understand it. Even if you're not talking about the person who doesn't understand, it's not okay because it makes the person left out feel awkward and uncomfortable. As hosts, meaning the staff, you should not be doing that to your guests, meaning the clients. This is something I think a LOT of asians don't get. Anyways, back to the spa.
So we do the facial first. The lady tells me that I will notice a visible difference in my skin after the facial is done. She preps my face with some creams and rubs and then wipes it off before starting on the diamond facial. So I'm guessing it's the "diamond" is machine that she used to scrape a few layers of skin off my face. It didn't hurt and it wasn't uncomfortable. After that, some more creams were slathered on my face and some more massaging. Then she puts on a mask and leaves me in the room for about 25 minutes. This is the part that I really didn't enjoy. I was so incredibly BORED! I wasn't tired enough to fall asleep and there was nothing to do but lie there with the mask on and a wet towel over my eyes. I tried to do some meditating, but I kept feeling the urge to sit up to do it. For some reason, I felt it really difficult to meditate in that room in the position I was in. Anyways, eventually, I took off the wet towel over my eyes and looked around. I started to suspect that every time they wipe my face, they've used a plain, wet paper towel. Anyways, so at the end, she came back and wiped the mask off, put some lotion on and sent me to the mani pedi room.
I went to the bathroom before going to the next treatment and checked out my face. Did it look noticeably better than before? Not really. Looking closer, I don't think the texture got any smoother and I didn't think my scars and other discolorations got any lighter. However, I thought I'd take another look when I get home and see how I feel then.
So on to the mani pedi! First, let me say I am not impressed with their idea of sanitary conditions. The foot bath has rust on the metal parts and I know for sure they don't clean the bath between clients. On top of that the service I got, though friendly, was not the most professional. Part of that is because of all the talking in another language, know there were people who didn't understand, and part of that was feeling like they were paying more attention to chitchatting than actually making sure they didn't get nail polish on my skin. It's not terrible, but I just feel like they could have done a better job. I really didn't feel more relaxed or pampered after the mani-pedi.
So in conclusion, I'd say the experience was not an impressive one. Lol! I might get another facial some day because I think it feels nice when my face is massaged, but I can't say I see any reason to get a manicure or pedicure. Of course, maybe it just wasn't a great experience at this facility. There might be other places that do a better job. I suppose I can give it another shot some other time and see how I feel then. At least, now I can say I've done it!
Monday, February 8, 2010
No 'poo movement
I am now officially a part of the No 'poo movement! It's a terrible name for a trend where people give up using shampoo and conditioner. My hair actually feels pretty good and I have no plans of going back to using shampoo anytime soon. It's been a gradual journey to this point.
The first thing I gave up was conditioner. I started using a cider vinegar hair rinse, which is about one tablespoon cider vinegar to a cup of water. You basically use that to rinse your hair after shampooing. My fiance generally hates the way it makes the bathroom smell like a salad bar, but fortunately, he doesn't shower the same time I do so he can avoid the bathroom after I'm done. :-)
Then I switched from shampoo to a shampoo bar. The shampoo bar is made from vegetable oils and contains no weird chemicals on its ingredients list. It can actually be used all over the body and is great for travel! At first, it was kind of weird to rub a block of soap on my head, but I got used to it. Once my hair got used to the soap, I realized that the soap was pretty moisturizing and I didn't need to use the cider vinegar rinse afterwards.
Once my shampoo bar ran out, I had a choice of either purchasing another or dropping shampoo altogether. I decided to at least try the No 'poo route. I dissolved a tablespoon of baking soda in a cup of water and poured it into a squeeze bottle. I worked it into my hair after wetting it and the mix felt slippery and slick. For this first time, I decided not to use the vinegar rinse to see if I even needed it. As it turns out, my hair felt a bit rough and scaly once it dried. So the next time, I used the vinegar rinse and the issue was solved.
I understand that not everyone can take this plunge and I don't generally tell people I meet that I wash my hair with baking soda and vinegar. I get strange looks when I tell people. I remember a few hair stylists telling me I have very healthy and shiny hair. On rare occasions, someone will ask me what I use in my hair and when I tell them, they fall silent and act rather awkward. The thing is, if my hair didn't feel nice and clean, I would not be continuing to wash my hair with baking soda and vinegar. It just so happens that this method works well for me. I like what it does for my hair and I like the fact that it's inexpensive AND it's not a weird chemically substance!
The first thing I gave up was conditioner. I started using a cider vinegar hair rinse, which is about one tablespoon cider vinegar to a cup of water. You basically use that to rinse your hair after shampooing. My fiance generally hates the way it makes the bathroom smell like a salad bar, but fortunately, he doesn't shower the same time I do so he can avoid the bathroom after I'm done. :-)
Then I switched from shampoo to a shampoo bar. The shampoo bar is made from vegetable oils and contains no weird chemicals on its ingredients list. It can actually be used all over the body and is great for travel! At first, it was kind of weird to rub a block of soap on my head, but I got used to it. Once my hair got used to the soap, I realized that the soap was pretty moisturizing and I didn't need to use the cider vinegar rinse afterwards.
Once my shampoo bar ran out, I had a choice of either purchasing another or dropping shampoo altogether. I decided to at least try the No 'poo route. I dissolved a tablespoon of baking soda in a cup of water and poured it into a squeeze bottle. I worked it into my hair after wetting it and the mix felt slippery and slick. For this first time, I decided not to use the vinegar rinse to see if I even needed it. As it turns out, my hair felt a bit rough and scaly once it dried. So the next time, I used the vinegar rinse and the issue was solved.
I understand that not everyone can take this plunge and I don't generally tell people I meet that I wash my hair with baking soda and vinegar. I get strange looks when I tell people. I remember a few hair stylists telling me I have very healthy and shiny hair. On rare occasions, someone will ask me what I use in my hair and when I tell them, they fall silent and act rather awkward. The thing is, if my hair didn't feel nice and clean, I would not be continuing to wash my hair with baking soda and vinegar. It just so happens that this method works well for me. I like what it does for my hair and I like the fact that it's inexpensive AND it's not a weird chemically substance!
Wednesday, October 7, 2009
Fashion magazine goes model-less
All I can say is, "Whoo hoo!" That's one less magazine in the world telling women they're inadequate cause they don't look like a woman that doesn't exist! Be proud of being REAL! Feel beautiful inside and out without dousing yourself with a million chemicals! Be a part of Operation Beautiful!
http://www.thelocal.de/national/20091005-22367.html
http://www.thelocal.de/national/20091005-22367.html
Friday, October 2, 2009
Body sugaring instead of waxing

In the last year or so, on and off, I get into these moods where I become enamored of the idea of not having to buy any more razors. I don't particularly like the fact that I have to keep buying more as they dull and I don't like the fact that the ones I like aren't cheap! So far the only alternatives I've heard of are waxing and body sugaring, both of which involve pulling the hairs out. Ouch! On top of that, I've been told that the stuff found in the wax you use to wax yourself is filled with nasty chemicals. Double ouch! As for body sugaring, it's a method you can do at home with some cotton strips and supplies in your pantry, so it involves no weird chemicals. As for the ouch factor? Some reviewers say it hurts the same as waxing and some say it hurts less than waxing. I guess it depends on your pain tolerance and the way you pull it? I dunno, but if you're wondering how to do it, here it is!
http://planetgreen.discovery.com/food-health/care2-hair-removal-sugaring.html
Friday, September 25, 2009
Color-enhancing shampoos and rinses
I saw this article thought this was pretty cool. Right now, I have no desire to play with color in my hair in any way, but in the past, I have considered it. I did, a few years ago, get highlights in my hair but I don't think I'll be doing that again anytime soon. The highlights are growing out and I'm pretty happy with my black hair right now. Anyways, if you're interested in how to enhance your hair color and/or highlights naturally, check out this article:
http://tipnut.com/color-shampoo/
http://tipnut.com/color-shampoo/
Monday, September 21, 2009
False eyelash removal

I posted before how much I love using extra virgin olive oil to remove my eye makeup. Well, I've recently found out that it works on removing false eyelashes too! The oil pretty much dissolves/loosens the glue within minutes and you can remove the lashes without any tearing! If your eyes are sensitive, use a q-tip to apply the oil so it doesn't get in your eyes. Wait a few minutes, brush your teeth, play with your cat, then using a cotton ball, gently wipe away your eye makeup, lashes and all!
Vinegar hair rinse as conditioner

My fiance thinks I'm obsessed with vinegar. I think the stuff is awesome! It kills mold, removes soap residue and has anti-static properties. On top of all that, it makes great dumpling sauce and salad dressings! What's not to love? So I'm going to write about yet another use I have for vinegar: hair conditioner! Remember how I said before that it removes soap residue and has anti-static properties? Turns out those properties are good for you hair too. The trick is not to use too much.
To start, you might want to dilite 1 tablespoon of apple cider vinegar in 1 cup of water. If you find that this leaves your hair too flat, you can reduce the amount of vinegar per cup of water. When you're ready to rinse the shampoo out of your hair, slowly pour and rub the vinegar hair rinse into your hair. Yes, your bathroom will smell like a salad bar, which is an odd smell to be smelling when you're showering, but it certainly isn't the worst smell out there. Lol! Anyways, I always rinse the vinegar out with water afterwards. I do walk out smelling faintly of vinegar, but it disspates once my hair is dry.
If you use this regularly, it will strip the soap residue out of your hair, leaving it shinier than before. It also conditions your hair just like a store-bought conditioner, but without the unfamiliar chemicals. Long-haired girls in NYC will know how absolutely awful the static can get in the winter. I've had hair stick to bathroom stall walls all around me! Ever since I started using this rinse though, I have not had this problem at all. It's seriously wonderful stuff! Of course, I can only speak about my own hair, which is long, thick and very straight. I have no idea if this works on curly hair as people with curly hair have the most issues finding the right conditioner. For those with curly hair, I'm curious to know how the vinegar rinse performs. It may not work as well, but not having any curly hair, it's hard for me to say one way or the other.
Tuesday, September 8, 2009
Homemade lemony hairspray
I have no idea if it will end up bleaching my hair, but I keep coming across it. There's also a method that includes Elmer's glue (not doing that one!) and a method that uses sugar water. I hear the sugar water hairspray works very well, but may attract wasps! So lemon hairspray it is.
Now, I've never actually used hairspray on myself, but I hate it when I take a curling iron to my hair, and after all my clumsy fumbling and bungling work to curl my hair, it falls back straight within an hour. Even so, I'm not desperate to get hairspray since I usually don't have the patience to style my hair. It's a once in a blue moon thing. So why not try the recipe out?
Basically, you cut up 1 lemon and boil it with 2 cups of water until it's been reduced down to at least half or less. Strain it through a cheesecloth, coffee filter or fine sieve and let cool. Once cool, bottle it into a fine mist spray bottle. It will keep for 2 weeks in the refrigerator, or 2 weeks unrefrigerated if you add an ounce of alcohol.
So I tried it out and guess what? It really works! However, not for free floating curls in my hair. Since the droplets are bigger than that of an aerosol can, the water weighed down my curls and straightened them as it dried. It didn't straighten completely, but it was straighter than when I released the curls from the curling iron. I think it would be great if I had my hair up in a french twist and needed to keep it in place. It doesn't smell overpoweringly of lemons, but it does have a lemon scent. So far, it doesn't look like it bleached my hair either. Perhaps it would work better if I got a spray bottle that squirts out a finer mist...
Now, I've never actually used hairspray on myself, but I hate it when I take a curling iron to my hair, and after all my clumsy fumbling and bungling work to curl my hair, it falls back straight within an hour. Even so, I'm not desperate to get hairspray since I usually don't have the patience to style my hair. It's a once in a blue moon thing. So why not try the recipe out?
Basically, you cut up 1 lemon and boil it with 2 cups of water until it's been reduced down to at least half or less. Strain it through a cheesecloth, coffee filter or fine sieve and let cool. Once cool, bottle it into a fine mist spray bottle. It will keep for 2 weeks in the refrigerator, or 2 weeks unrefrigerated if you add an ounce of alcohol.
So I tried it out and guess what? It really works! However, not for free floating curls in my hair. Since the droplets are bigger than that of an aerosol can, the water weighed down my curls and straightened them as it dried. It didn't straighten completely, but it was straighter than when I released the curls from the curling iron. I think it would be great if I had my hair up in a french twist and needed to keep it in place. It doesn't smell overpoweringly of lemons, but it does have a lemon scent. So far, it doesn't look like it bleached my hair either. Perhaps it would work better if I got a spray bottle that squirts out a finer mist...
Friday, August 21, 2009
Foundation
I generally don't wear makeup, but there are times when I am willing to put in the effort to get dolled up. I used to have really great skin. I mean it used to be totally smooth and even. Now, it's uneven and has rough patches here and there. Chalk it up to age, stress, bad lifestyle or whatever, but it is what it is. So I need something to even out my face.
Depending on how much time I want to spend applying makeup, I may or may not be too lazy to apply a primer. On special occasions where I actually want to look nice and stay looking nice, applying a primer for my face and another for my eyes is a must. I highly recommend Philosophy's The Present Clear Makeup for the face and Urbay Decay's Eyeshadow Primer Potion for the eyes.
Now that your face is set to take on color, you can start applying foundation. If I want to be quick and dirty, I'll brush on some light mineral makeup or loose powder foundation. You can actually make your own loose powder foundation. My formula uses mostly zinc and titanium oxide, which are white powders often found in sunblocks, and a tiny mix of red and yellow iron oxides to get my skin tone color. I've also seen a recipe where cornstarch was used as a base (good for absorbing oil) and cocoa powder was used to give colored tint. Anyways, mineral makeup may be good for every day use, but sometimes you want some more coverage.
That's when I started hunting for liquid foundation. I happen to like Neutrogena's Healthy Skin Liquid Makeup. I had an old bottle that had to be thrown out and was about to get a new one when one day, I happened to be browsing at a Sephora. I was very intrigued by the rave reviews of Makeup Forever's HD foundations so I shelled out the big bucks and got myself a bottle. Was I a happy customer? You bet! Would I get it again? Not sure. Neutrogena's is cheaper and really does work quite well for me. However, I will say that Makeup Forever's HD foundation keeps me matte all day long, which is a big plus for me! In the end, I'm not sure what I'll get when I finally run out of my pricey foundation. For now, I can say I recommend trying out both brands for yourself.
Of course, you can also mix up your own tinted lotion as a foundation. Just use your iron oxide colors and mix it into your favorite facial lotion to tint it to your skin tone. If you want more coverage, add some zinc and/or titanium oxide to it, which gives it the added benefit of adding a sunblock element to your lotion. Don't overdo it with the powders because it changes the texture of the lotion by making it heavier and thicker. One of these days, I'll get around to posting my favorite lotion recipes here too! Lotions are easy to make!
Depending on how much time I want to spend applying makeup, I may or may not be too lazy to apply a primer. On special occasions where I actually want to look nice and stay looking nice, applying a primer for my face and another for my eyes is a must. I highly recommend Philosophy's The Present Clear Makeup for the face and Urbay Decay's Eyeshadow Primer Potion for the eyes.
Now that your face is set to take on color, you can start applying foundation. If I want to be quick and dirty, I'll brush on some light mineral makeup or loose powder foundation. You can actually make your own loose powder foundation. My formula uses mostly zinc and titanium oxide, which are white powders often found in sunblocks, and a tiny mix of red and yellow iron oxides to get my skin tone color. I've also seen a recipe where cornstarch was used as a base (good for absorbing oil) and cocoa powder was used to give colored tint. Anyways, mineral makeup may be good for every day use, but sometimes you want some more coverage.
That's when I started hunting for liquid foundation. I happen to like Neutrogena's Healthy Skin Liquid Makeup. I had an old bottle that had to be thrown out and was about to get a new one when one day, I happened to be browsing at a Sephora. I was very intrigued by the rave reviews of Makeup Forever's HD foundations so I shelled out the big bucks and got myself a bottle. Was I a happy customer? You bet! Would I get it again? Not sure. Neutrogena's is cheaper and really does work quite well for me. However, I will say that Makeup Forever's HD foundation keeps me matte all day long, which is a big plus for me! In the end, I'm not sure what I'll get when I finally run out of my pricey foundation. For now, I can say I recommend trying out both brands for yourself.
Of course, you can also mix up your own tinted lotion as a foundation. Just use your iron oxide colors and mix it into your favorite facial lotion to tint it to your skin tone. If you want more coverage, add some zinc and/or titanium oxide to it, which gives it the added benefit of adding a sunblock element to your lotion. Don't overdo it with the powders because it changes the texture of the lotion by making it heavier and thicker. One of these days, I'll get around to posting my favorite lotion recipes here too! Lotions are easy to make!
Best makeup primers
While I was still thinking seriously about doing my own makeup for the wedding, I started researching ways to make my makeup applications last. See, I have a major, major problem with makeup meltdowns and smudges. I always end up shiny with panda eyes at the end of the day. Of course, it doesn't help that I don't generally wear makeup so my experience applying the stuff isn't very steady.
Anyways, I came across recommendations for face and eye primers. At first, I was really impressed with silicone primers. I've tried the Smashbox brand and the Sephora Professional brand. I liked them because not only did it smooth the texture my skin, allowing for a smooth application of foundation, but it also made my face matte. Unfortunately for me, it doesn't last the entire day, and using them often made my face break out. Not good!
Then I read some rave reviews for Philosophy's The Present Clear Makeup. It's a better deal in terms of price compared to Smashbox and the Sephora Professional and when I tried it out, I loved it! Honestly, my foundation stayed on all day and my face stayed fairly matte. It also didn't make my face break out!
So now that I've found a primer for my foundation, I needed something keep my eyes from looking like I got punched at the end of the day. Urban Decay's Eyeshadow Primer Potion to the rescue! This stuff is GREAT! I mean, for the first time EVER, my eye makeup didn't smudge! I totally love this stuff!
So right now, my fave primers before makeup application are Philosophy's The Present Clear Makeup and Urban Decay's Eyeshadow Primer Potion. They're not cheap, but well worth the price if you want some assurance that you won't end up looking like a clown.
Anyways, I came across recommendations for face and eye primers. At first, I was really impressed with silicone primers. I've tried the Smashbox brand and the Sephora Professional brand. I liked them because not only did it smooth the texture my skin, allowing for a smooth application of foundation, but it also made my face matte. Unfortunately for me, it doesn't last the entire day, and using them often made my face break out. Not good!
Then I read some rave reviews for Philosophy's The Present Clear Makeup. It's a better deal in terms of price compared to Smashbox and the Sephora Professional and when I tried it out, I loved it! Honestly, my foundation stayed on all day and my face stayed fairly matte. It also didn't make my face break out!
So now that I've found a primer for my foundation, I needed something keep my eyes from looking like I got punched at the end of the day. Urban Decay's Eyeshadow Primer Potion to the rescue! This stuff is GREAT! I mean, for the first time EVER, my eye makeup didn't smudge! I totally love this stuff!
So right now, my fave primers before makeup application are Philosophy's The Present Clear Makeup and Urban Decay's Eyeshadow Primer Potion. They're not cheap, but well worth the price if you want some assurance that you won't end up looking like a clown.
Monday, June 15, 2009
Best eye makeup remover!
You want to know what it is? It's extra virgin olive oil! Yes, that's right! Good ol' olive oil takes off even waterproof mascara! Just take a cotton ball with some extra virgin olive oil on it and place it on your eye. If it's a stubborn kind of waterproof makeup you got on, then leave it on for about 30 seconds. Then wipe off! For really stubborn waterproof makeup, follow with a gentle facial cleanser. Personally, I've never had to use a cleanser afterwards as the makeup will usually just wipe right off. The cool thing about this is not only does olive oil not have lots of weird chemicals in it, it's good for you eye area and it really works!
Subscribe to:
Posts (Atom)